So you just created some walks on your phone and you want to start your walk – phone in your pocket, just guided by your watch.
How to get walks on the watch?
It happens automatically, but…
- TrackGuide must be open on your watch to receive the walks.
- If you just finished installing TrackGuide on a watch that did not have TrackGuide before, it might take some time (minutes) before watch and phone are on speaking terms. If you see nothing appearing on your watch, just wait some minutes and try again.
Whenever you create or delete a walk on your phone, the list of walks is sent to the Watch. The watch then removes walks no longer present on the phone from its database and adds the new ones. Only the general walk information is automatically synchronised this way. Trackpoints, interesting points, pictures etc… are not send over with the walk information. You can bring them over when you need them on your watch by a simple tap on a button though.
To force the synchronisation of walks between your phone and your watch, you can drag the table with the walks down on your phone and let go. Still no walks on you watch? Wait a few minutes and try again. Phone and Watch need some negotiation time before they can talk to each other. But once they do, it just works.
The Watch App
Main interface
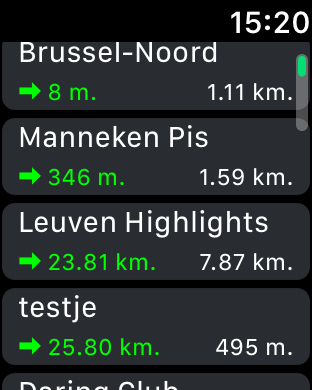
the main interface of the app shows a list of all the walks it knows about. It should list exactly the same walks as the linked iPone. The list is ordered closest walks first. If your watch does not have a GPS fix (yet), the distancefield shows “=> 100 km” and its color will be red instead of green. The red color is also used for walks further than 30 km away. You have to move closer to the start of these walk in order to open the details on your watch.
For every walk, this table shows
- Its name
- How far you are way from its startingpoint. When the screenshot above was taken, we were only 8 meters separated from the start of a walk named “Brussel-Noord” (a walk generated by TrackGuide phoneApp from our current position the the trainstation named “Brussel Noord”. )
- The total length of the walk. To get to the North Station, we had to walk 1.11 kilometers.
Summary of a walk
Tap a walk in the list, and the interface below opens (we tapped a walk named ‘Comic book’, a walk passing lots of murals based on comics in Brussels) :

A walk is just like Tom Thumbs breadcrumb trail : a list of points to pass one by one. Each point is called a trackpoint. A long walk can be made out of hundreds of these points. If the trackpoints are not yet brought over from your phone, you see a big red ‘Synchronize’ buton. Tap it and the points come over. The phone app must not be started, but your phone must be close to the watch. If your walk contains lots of photos, this synchronisation can take several minutes. When finished…

…”Synchronize” becomes “Walk”, the number op trackpoints appears and the buttons “Reload” and “Clear” are added to the interface. (The button ‘Old’ starts the ‘vintage’ guiding screen. That screen is more friendly on your battery and cpu. For long walks on old watches, this might be the better option)
- Tap “Reload” to refresh the trackpoints on your watch with the points on your phone.Might be usefull when
- You added or removed points on your phone, or you added or modified POI’s (interesting points with pictures) or instructions on your phone. “Synchronize” brings over the latest modifications.
- If the walk was generated by the phone (from your current position to some point), the phone will recalculate the walk from your new location before sending them.
- Tap clear to remove the points from your watch. This frees some of your watches memory, and you can always re-synchronize later.
- Tap ‘Walk’ when you start your walk.
- Tap “<” (top left) to go back to the main interface..
Walking
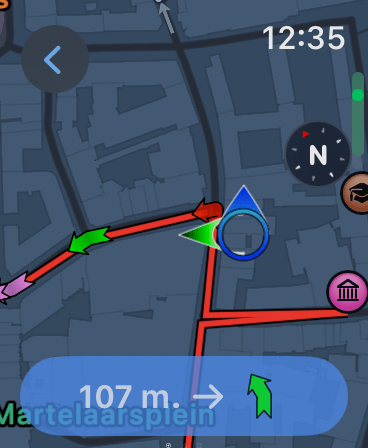
The maps come from Apple – for which you need a 4G connection. The walk-interface shows your current position (blue circle in the middle), the point you just passed (red arrow), the point you should to to (green arrow) and some points you have to pass next (purple arrows). If TrackGuide has some extra info on a point, a little blue flag is added to it. Other elements of this interface are
- The bottom area shows the distance to the next point on your walk : 107 meter
- Next to this distance sits an arrow showing what to do when you reach the next points. If that arrow points 27° to the right, you’ll have to go 27° to the right at that point. If you are on track, the shape of this arrow equals the shape of the green arrow. If you are off track, the shape is adapted to reflect your different incoming corner.
- If the next point has a POI (Point of Intrest) attached to it, and that POI has a picture, a miniature of that picture will replace the green arrow. Next screenshot shows such a point.
Be aware: TrackGuide considers the green point as reached when the distance between the point and your GPS-position is less than 12 meter. It does so to compensate for bad GPS reception between tall buildings (GPS readings always seems to lag). The 12 meters can be changed in the settings window of the phone app. The screenshot above shows this : the point we are about to pass is red already as we are close enough to consider it as reached.
The blue dot in the middle…
… represents you. Attached to that dot are two arrows :

- The blue arrow shows where you are heading to on the maps. Looks as we are following the yellow road. it is hidden below the green arrow on the screenshot above. Which is good, as it means that where we are heading to and where we should be heading to do match!
- The green arrow tells us which direction to go in the real world if we want to reach the green arrow given the current GPS position. Left is left, right is right, up if straight ahead and down is U-turn.
- The blue dot is filled with red ink if the error margin to the GPS measurements have a large error margin.
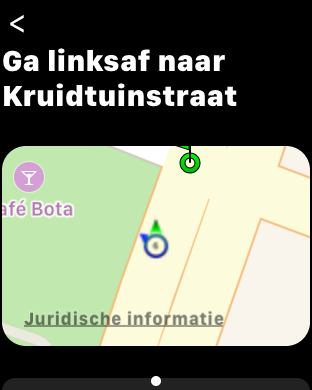
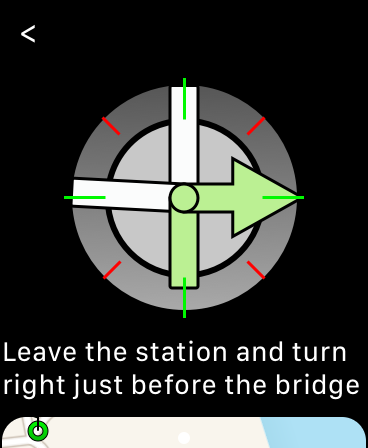
Points with flags
There are 3 types of flagged points : below an example of each :

…
This info is shown as soon as you reach a flagged point. If not – bad GPS reception is everywhere – just tap the watch interface to bring it up. Simple guiding instructions are automatically closes after 5 seconds. For other info, you have to press the small cross in the upper left corner to return to the guiding screen.
If more than k. interesting point is attached to a trackpoint (a square with a cathedral, some guild houses and a statue…), you can swipe through them. White dots at the bottom of this interface indicate the number of points.
Other Screens
You can swipe the map view to the left to get to the elevation screen or the walk overview screen :
Elevation
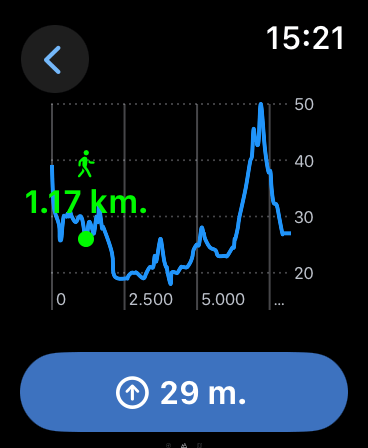
This screen shows the elevation profile of your walk (if no elevation data was present in the gpx file this walk is based on, it will just show a flat line).
- The x-axis shows the distance
- The y-axis show the elevation (legend on the left)
- A small figure shows your current position. Below this figure, you see how far you did walk already
- At the bottom of this screen, you see your current elevation.
On the screen above, we are 29 meters above see level after having walked 7 kilometres.
Walk Overview

This screen displays a map with the complete walk.
- A checkered flag is placed at the end of the walk
- A figure shows your current position
- The text at the bottom tells you how far it is to the end of
- Two arrows – one at the start and one halfway – should give an indication of the general direction of the walk (clockwise or counterclockwise). “Should”, because not every walk is a perfect circle.
- Tap the button top-right (the location button) to center this map on your current position after you dragged the track out of view. You will sure do this accidentally when you want to swipe the window to the right to get back to the elevation view.
You can drag this screen around to display other parts of the map. You can zoom in-out using the digital crown. Swiping the map to the right will just display another part of the map. If you want to go back to the elevation view, you must swipe the blue text background – not the map.
