As always when you want to add a walk, you start by clicking the plus button at the top right. If you want to create a walk by tapping its points on a map, you choose ‘Create one by hand’ from the menu. And then you start tapping…
This screen has two modes – you switch mode using the button at the bottom-center of the windos
Editing Mode
Use editing mode to add, remove or move points on a track. You can add or mofify POIs (POI = Point Of Interest or Interesting Point) in this mode as well : just force-tap (3d touch) the trackpoint to which you want to add a POI. On phones without 3d touch, a long press will do the trick. In Editing mode, POI’s are always displayed as flags on the map so you can precisely drag them into place.
When you tap on the map, a new point is added. Tap between two points on the line (error margin is calculated in meters, so zoom in to add intermediate points) to add a point in between. Otherwise, the new point will be added at the end.
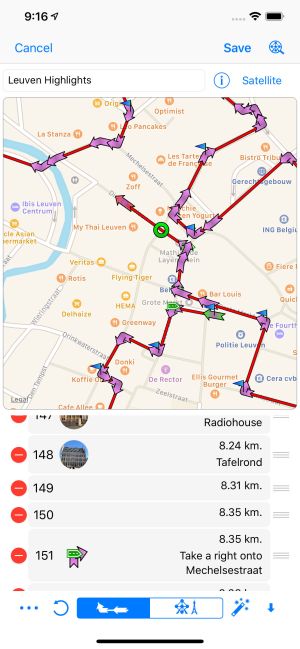
Here is a screenshot (version 6.2 – end may) of the editing window in editing mode. While the selected trackpoint has a POI with photo – see the thumbnail in the table – the map shows just the green circle in flag (green because selected) :
Generate intermediate points
The magic wand button (bottom right of the screen in editing mode) lets you toggle autocompletion on or off. If on, you do not have to tap each and every distinct trackpoint to tap a walk – just tap some points you absolutely want to pass and TrackGuide will fill in the intermediate points with routing instructions. Please know :
- You need an internet connection for this feature (as the route is calculated on Apple’s servers)
- If the point you tap on is less than 50 meters away (straight line) from the latest point, no intermediate points will be added.
- Autocomplete will always try to calculate the shortest route.
- Not happy with the calculated intermediate points? Tap the undo button (bottom left) to remove the latest point plus all points generated for it.
- This feature does not work in the woods, or where Apple Maps does not know any route.
- For routing instructions to be generated, do not tap on a crossroad or a split, but a few meters past it so autocomplete adds the turn, not you.
POI Mode
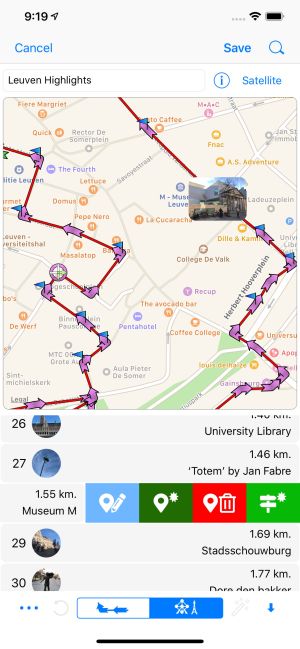
Use POI mode to add, remove or edit POIs or routing instructions. If you select a point in the table with an attached POI that has a picture, a thumbnail of that picture is shown on the map – not the green flag. Likewise, if the point has routing instructions attached, the corresponding routing symbol will be shown on the map. If you tap a point on the map, the corresponding point in the table will be selected. No points will be added.
A page dedicated to creating routing instructions is available here, and another one on editing POI’s can be found here.
A little movie to clarify :
