This post continues where the previous one – Watch App Guide 1 : Getting Started – ended : a walk selected on your watch, points loaded and ready to walk.
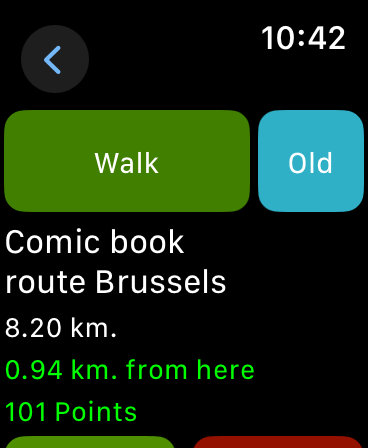
Tap “Walk” to start the guidance. The “Old” button opens the original trusted map screen. The old screen is more friendly on your battery. If you have an old watch with an old battery, this could be the preferred option for long walks.

When you tap the ‘Walk’ button on your watch, the TrackGuide watch app shows you a map with some symbols
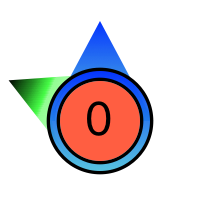


The symbol in the middle of the map represent your location. If the GPS signal is bad (which does not mean “not correct”), it has a red background. There are 2 arrows attached to this symbol :
- A blue arrow showing your direction on the map. As version 10 of the watch app alligns the map with your direction, this arrow should point up if you are holding your watch parallel to your chest.
- A green arrow showing where to go to. If that arrow points left, you should turn left. If it turns right, go right. If compass readings are unreliable, the green arrow disappears.
The watch knows where you are heading to : all Apple watches that run watchOS 10 have an embedded compass. If you are close to large metallic objects or wires transporting high currents, the compass can be unreliable. In that case, you’ll notice the map does not align with the roads below your feet.
Other symbols on the watch screen include


- A red arrow for the last trackpoint reached
- A green arrow for the next point on your route
- Purple arrows for the points thereafter
- A red line showing the track to follow
The directions of the arrows reflect the direction of your walk. the geen arrow above points to the right, so must turn right when you reach it. Whenever there is some instruction or point of intrest (POI) attached to a point, it will be flagged.
If the next point (the green arrow) has a POI attached with a photo, you’ll see a miniature version of that photo in stead of the green arrow :

At the bottom of the screen, you see how for you have to walk in order to reach the next point. On the screenshot above, the next point is only 21 meters away. If you are less than 12 meters away from the next point, TrackGuide will mark that point as reached and start guiding you to the point thereafter.
The arrow next to the distance will start green, but gradually turn red if you come closer.

Pingback: Walking with the Phone app | TrackGuide
Pingback: Watch App Guide 1 : Getting Started | TrackGuide